Integration options
The Braze integration supports four patterns for moving data between the platforms. Each pattern serves a different use case.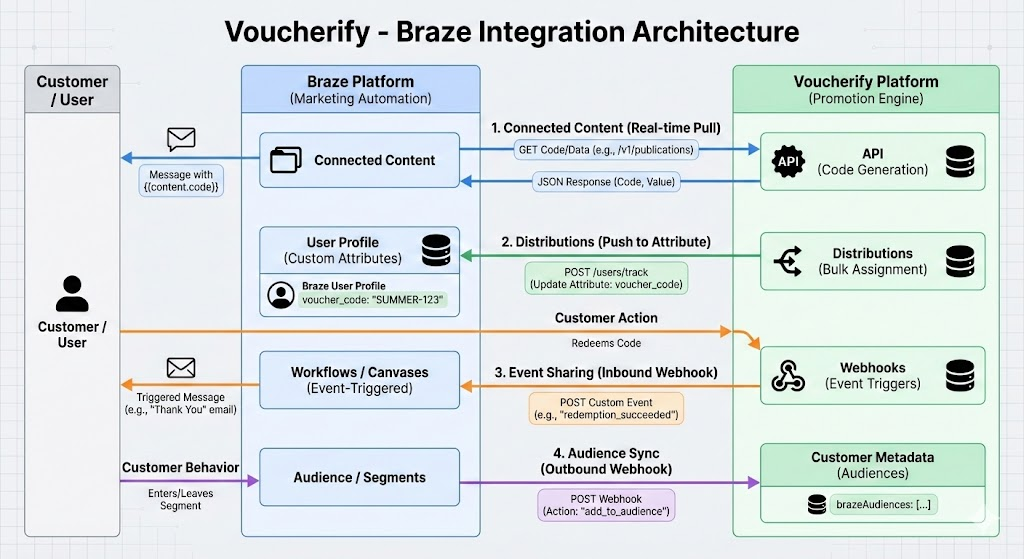
| Pattern | Direction | What it does |
|---|---|---|
| Connected Content | Braze calls Voucherify | Fetches codes, balances, or gift card data from Voucherify at message send time. Best for real-time personalization. |
| Custom attributes | Voucherify pushes to Braze | Stores codes and promotion data on Braze user profiles via distributions. Best for pre-assigning codes before a campaign. |
| Promotion code lists | Manual export/import | Exports codes from Voucherify in bulk and imports them into Braze promotion code lists. Best for large-scale, one-time distributions. |
| Event streaming | Voucherify pushes to Braze | Sends promotion events (redemptions, publications, loyalty updates) to Braze. Best for triggering follow-up messages based on customer activity. |
The Braze integration supports two-way data exchange between Braze and Voucherify.
- Data sent from Braze to Voucherify, including custom attributes and audience sync, consumes webhook limits.
- Connected Content requests from Braze to Voucherify consume API limits.
- Events sent from Voucherify to Braze do not consume API call or webhook limits.
What you need to connect with Braze
Voucherify and Braze communicate both ways. You need credentials configured in each platform.Connect Voucherify with Braze
This connection lets Voucherify push events and custom attributes to Braze.Copy the Braze REST API key
In your Braze account, create or locate a REST API key with at least the
users.track permission.Connect Braze with Voucherify
This connection lets Braze call Voucherify APIs for Connected Content, Canvas webhooks, and other API-based integrations.Generate integration keys in Voucherify
In Home > Project Settings, scroll to Integration keys and click +. Name your key, assign a role, and select Braze from the integration list. Click Create integration API.
Save your credentials
Copy the Application ID and Secret key. You will not be able to view the secret key again.
Rate limiter
When configuring campaigns in Braze, limit the number of messages sent per minute. This helps prevent excessive traffic to Voucherify API endpoints used by Braze campaigns and Connected Content requests. Set the sending rate according to your Voucherify API rate limits. When calculating the limit, account for other API consumers in your project.Next steps
Explore the following pages to match Voucherify to your Braze use cases.Connected Content
Fetch codes and loyalty data from Voucherify at send time.
Stream events to Braze
Use Voucherify events to trigger action-based delivery in Braze.
Send data from Braze
Sync customer segments and forward events to Voucherify with Canvas webhooks.
Custom attributes
Push codes to Braze user profiles with Voucherify distributions.
Promotion code lists
Export codes in bulk and import them into Braze.
Speedrun loyalty with Braze
Learn how to tweak and experiment in Voucherify to gain even better results with your Braze campaigns.