Airship is a customer relationship management (CRM) platform that seamlessly manages customer interactions, streamlines sales processes, and cultivates lasting relationships.
This integration allows you to send data from Voucherify to Airship. You can inform your customers of promotions and distribute customized coupons. With event-triggered Airship campaigns, you can react to various occasions with new Voucherify coupons and gift cards, which will be delivered to your customers.
You can trigger sending messages through action-based delivery and, as a result, send out codes to customers:
- During bulk delivery to a customer segment,
- When a customer enters or leaves a customer segment,
- As a response to an outstanding order or a custom event.
How does the integration work?
The example below shows the implementation of the following scenario:
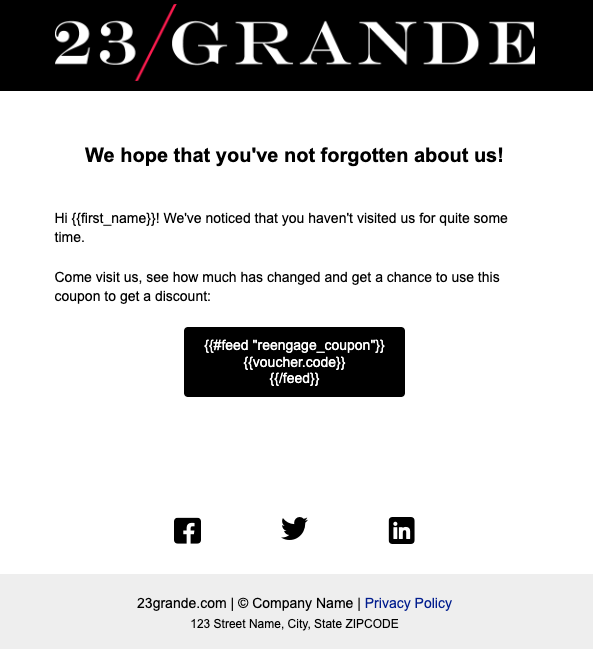
- Customers who haven’t visited the store for some time should be offered a discount coupon to draw them back.
- Only the customer who has received the voucher should be able to redeem it.
- The customer should receive personalized coupons via email.
Setting up the integration in Voucherify
In Voucherify, generate API integration keys for Airship.
- Go to Project Settings, and in the General tab, scroll down to Integration Keys.
- Click the plus button on the right.
- Fill in the Name for your key.
- Choose your role from the Role drop-down list.
- Choose Airship from the Integration drop-down list.
- Click Create Integration API Key.
Integration credentials are hidden after savingWhen you configure an external integration, API tokens and secret keys are only shown during setup.
After you save the integration, these values are masked and cannot be viewed again in the Dashboard.This reduces the risk of exposing sensitive credentials through the user interface.Save your keys securely before closing the window.
How to distribute Voucherify’s unique coupons with Airship
Follow these steps to distribute coupons with Airship.
Step 1: Prepare a Voucherify campaign to engage inactive customers
In this example, create a unique coupon campaign used, in which the whole cart is discounted by 10€.
Set the campaign to Customers will be allowed to join the campaign only once. As a result, the customer will receive only one code from the campaign. Each subsequent code publication for the customer who has already received one will return the original code. If this setting is turned off, each subsequent code publication for that customer returns a new coupon code.
The campaign ID will be needed later. To obtain the campaign ID, use the GET List Campaigns endpoint or copy it from the campaign list view.
In your Airship project, go to Settings > Project configuration > External Data Feeds and select the Add data feed. An Add data feed box will appear. Fill it in as follows:
-
Friendly name: this is the name of the Content API endpoints. It can’t be changed afterward. In this case, it is named New Reactivation Voucher because it will send out voucher codes from the Customer Reactivation campaign.
-
Feed ID: unique feed identifier. In this case: new_reactivation_voucher.
-
Description: a short description of the data feed.
-
Request URL: type in the address of the Create Publications endpoint:
{{API_URL}}/v1/publications/create?campaign=[Voucherify campaign ID]&customer={{ua_named_user_id}}.
- You can find your API URL in your Voucherify Project Settings in the Application Information section under the API endpoint label.
- The Create Publication API endpoint requires at least two parameters:
- Voucherify campaign ID.
- Customer ID who the newly generated voucher code will be assigned to. This value will be mapped to the customer
source_id field in Voucherify. The {{ua_named_user_id}} variable is a customer’s unique identifier in Airship. You can see the list of user attributes and add custom ones under the Attributes option in the Audience menu.
-
Confirm request URL domain: type in
api.voucherify.io.
-
In the Headers section
- Add
X-App-Id and X-App-Token headers generated in Setting up the integration – Voucherify.
- Set
Content-Type header to application/JSON.
Click Next and confirm that you have the right to make API requests to your Voucherify account. In this step, you can also throttle the requests. This option will make sure that a marketing campaign won’t deplete your API limits.
In the last step, you can define the object location.
Step 3: Use the External Data Feed in an Airship message
-
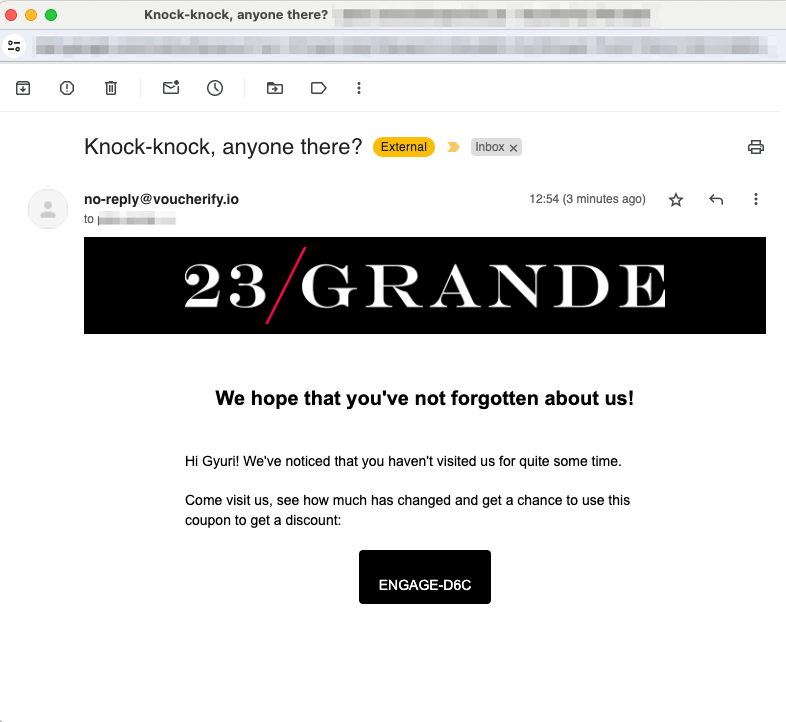
Create a new Airship message. This example is a one-time email outbound message that targets customers who have not visited an e-commerce site in 30 days.
-
Prepare the email content. In Airship, you can use the curly braces to insert, e.g., the customer’s name into the email content. As a result, the Data Feed created in step 2 will be called, and its response will be parsed to display the desired details to the customer.
- To invoke the configured Data Feed with its parameters for Voucherify to publish a new code to an email’s recipient and extract only the published voucher’s code from the response, use this snippet:
{{#feed "reengage_coupon"}}{{voucher.code}}{{/feed}}
-
When you publish your campaign and messages are sent (on a scheduled time or as soon as possible), each message will be tailored to every customer and will contain the voucher code that has been published to them.
-
You can see each publication call made during the email send-out in the Audit Log in your Voucherify Dashboard.
You can also view the generated codes in the campaign dashboard in the Vouchers tab.
Scenario: Referral code and loyalty card publication
Assigning a referral code or loyalty card is very similar to the one described above. All you need to do is change the campaign name parameter to the referral or loyalty campaign that you have created. Visit the Voucherify Help Center to learn more about referral programs and loyalty programs.
In this example, the customer’s code will be retrieved from the referral program with the ID camp_f0bKCWIYyTfOept56g2UMLY7. If the Customer will be allowed to join the campaign only once the option is turned on in the referral program configuration, the customer who is a program member will receive their already-assigned referral code. If a referral code hasn’t been assigned yet to the customer, they will receive the code, which will be present in the response.
First, configure the Data Feed.
Then, to retrieve and embed the referral code, use the following code: {{#feed "referral_code"}}{{voucher.code}}{{/feed}}
The customer can share their referral code with a friend. When they use it during a purchase, the referrer will be awarded the gift you’ve set up in the Voucherify Dashboard.