> ## Documentation Index
> Fetch the complete documentation index at: https://docs.voucherify.io/llms.txt
> Use this file to discover all available pages before exploring further.
# MoEngage
> Let customers know about promotions and distribute customized coupons
MoEngage is a customer engagement platform that provides a suite of tools to help businesses engage customers, including personalized messaging, web and mobile push notifications, email marketing, and analytics, among others.
## How does the integration work?
MoEngage ContentAPI is a third-party API client that allows businesses to deliver personalized content to their customers in real time.
Thanks to this integration, you can inform your customers of promotions and distribute customized coupons to every one of them. With event-triggered MoEngage campaigns, you can react to various occasions with Voucherify coupons and gift cards, which will be delivered to your customers.
The example below shows the implementation of the following scenario:
* Customers who haven’t visited the store for some time should be offered a discount coupon to draw them back.
* Only the customer who has received the voucher should be able to redeem it.
* The customer should receive personalized coupons via email.
## How to distribute unique coupons with MoEngage?
Follow these steps to distribute coupons.
### Prepare a Voucherify campaign to engage inactive customers
In this example, a unique coupon campaign is used, in which the whole cart is discounted by 20% and capped at \$100. To learn more about creating unique coupon campaigns and how they work, visit [this tutorial](/build/create-discount-coupons).
The important setting here is the **Customers will be allowed to join the campaign only once** option. When it is turned on, the customer will receive only one code from the campaign. Each subsequent code publication for the customer who has already received one will return the original code. If turned off, every time a coupon is requested, the customer will get a new coupon code. With this option, you can decide if you want your customer to receive multiple reactivation codes or just one.
You will need the campaign ID needed later. You can obtain the ID by calling [the get campaign endpoint](/api-reference/campaigns/get-campaign) or copy it from the web browser address bar when you open the campaign dashboard.
### Configure a MoEngage Content API endpoint which will publish a new code from the campaign
In your MoEngage account, go to **Settings** > **Advanced settings** > **Content API,** and select the **Add Content API** button. Fill it in the following way:
1. **API Name**: this is the name of the Content API endpoints. It can’t be changed afterwards. In this case, it is named new\_reactivation\_voucher because it will send out voucher codes from the Customer Reactivation campaign.
2. **API Url**: type in the address of the Create Publications endpoint: `{{API_URL}}/v1/publications/create`. You can find your **API URL** in your Voucherify **Project Settings** in the **Application Information** section under **API endpoint**.
3. In the **URL Parameters** tab:
1. Add a **customer** parameter and fill in the MoEngage field that should be used as the customer’s **source\_id** field in Voucherify. In this case, the customer’s email is used as **source\_id**. Refer to MoEngage documentation to learn more about [user attributes](https://help.moengage.com/hc/en-us/articles/207836953-Derived-Events-Attributes#tracked-standard-attribute-0-15).
2. Add a **campaign** parameter and fill in your Voucherify campaign ID. The API URL is automatically updated with the filled-in parameters.
4. In the **Headers** tab, add `X-App-Id` and `X-App-Token` headers. You can generate the application keys for integration with MoEngage in your Voucherify **Project Settings**. In the **General** tab, scroll down to **Integration Keys** and create a new integration API key for MoEngage. In the **Name** field, enter the name of your key. In the drop-down lists, select **User** in **Role** and **MoEngage** in **Integration**.
Integration credentials are hidden after saving
When you configure an external integration, API tokens and secret keys are only shown during setup.
After you save the integration, these values are masked and cannot be viewed again in the Dashboard.
This reduces the risk of exposing sensitive credentials through the user interface.
Save your keys securely before closing the window.
5. After you save the configuration, you can test it with the play icon. If everything is configured correctly, you will see Voucherify’s response.
### Use the Content API endpoint in a MoEngage campaign.
1. Create a new MoEngage campaign. This example is a one-time email outbound campaign that targets customers who have not visited an e-commerce site in 30 days.
2. Prepare the email content. In MoEngage, you can use [the Jinja templating language](https://help.moengage.com/hc/en-us/articles/115002757783-MoEngage-Templating-Language-JINJA-) to insert e.g. the customer’s name into the email content. As a result, the Content API endpoint created in Step 2 will be called, and its response will be parsed to display the desired details to the customer.
1. To call Voucherify’s create publication endpoint and publish a new code to an email’s recipient, use this code snippet:
```
{% set publication = ContentApi.new_reactivation_voucher({({"params":{"customer":"{{UserAttribute['Email (Standard)']}}"}})}) %}
```
2. To extract only the published voucher’s code from the response, use this expression:
```
{{publication.voucher.code}}
```
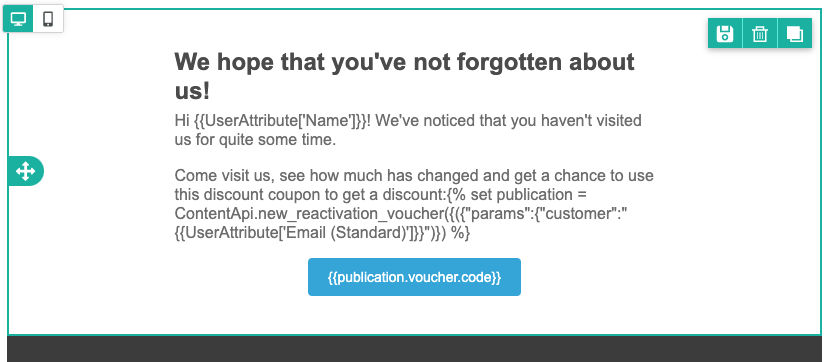 3. You can preview how the message will appear to a particular customer after you click the preview button in the template editor [in the personalized mode](https://help.moengage.com/hc/en-us/articles/4406091894292). You can also test it by sending an email using the **Test Campaign** field below the template editor.
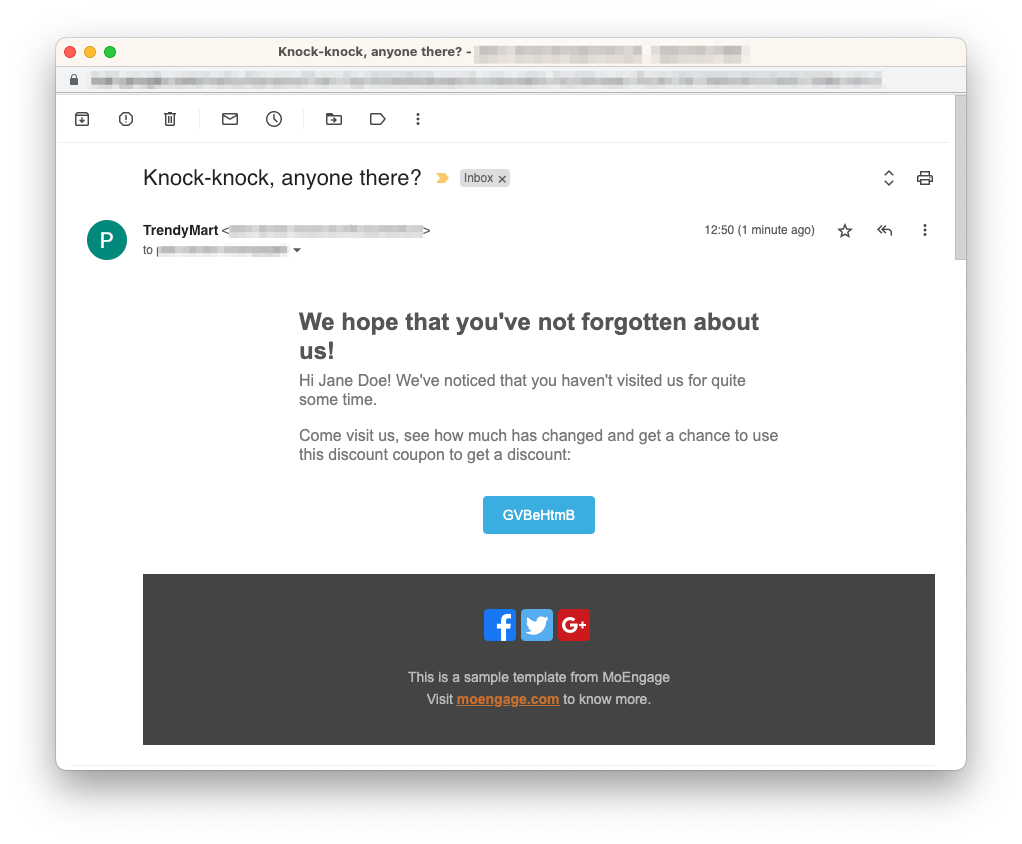 4. When you publish your campaign and messages will be sent (on a scheduled time or as soon as possible), each message will be tailored to every customer and will contain the voucher code that has been published to them:
5. You can see each publication call made during the email send-out in the **Audit Log** in your Voucherify **Dashboard**.
You can also view the generated codes in the campaign dashboard in the **Vouchers** tab.
### Referral code and loyalty card publication
The process of assigning a referral code or loyalty card is very similar to the one described above. All you need to do is to change the campaign name parameter to the [referral](/build/referral-campaign-overview) or [loyalty campaign](/build/loyalty-campaign-overview) that you have created.
If the **Customer will be allowed to join the campaign only once** option is turned on in the referral program configuration, the customer who is a program member will receive their already-assigned referral code. If a referral code hasn’t been assigned yet to the customer, they will receive the code, which will be present in the response.
First, configure the **Content API** endpoint the same way as before. Remember to paste the referral program ID.
Then, to retrieve the loyalty card, use the following code:
```
{% set ref_code = ContentApi.get_customer_referral_code({({"params":{"customer":"{{UserAttribute['Email (Standard)']}}"}})}) %}
```
The customer’s referral or loyalty card code is accessible with the same snippet:
```
{{ref_code.voucher.code}}
```
## Flows
A **Flow** in MoEngage lets you trigger actions in Voucherify based on what your users do.
Here’s how you can use it:
* **Send custom events** to Voucherify (like when a user opens an email or joins a segment)
* **Sync customer data** to keep your Voucherify profiles up to date
* **Publish referral codes** to new users automatically
It’s a simple way to connect user actions in MoEngage with campaigns and data in Voucherify.
4. When you publish your campaign and messages will be sent (on a scheduled time or as soon as possible), each message will be tailored to every customer and will contain the voucher code that has been published to them:
5. You can see each publication call made during the email send-out in the **Audit Log** in your Voucherify **Dashboard**.
You can also view the generated codes in the campaign dashboard in the **Vouchers** tab.
### Referral code and loyalty card publication
The process of assigning a referral code or loyalty card is very similar to the one described above. All you need to do is to change the campaign name parameter to the [referral](/build/referral-campaign-overview) or [loyalty campaign](/build/loyalty-campaign-overview) that you have created.
If the **Customer will be allowed to join the campaign only once** option is turned on in the referral program configuration, the customer who is a program member will receive their already-assigned referral code. If a referral code hasn’t been assigned yet to the customer, they will receive the code, which will be present in the response.
First, configure the **Content API** endpoint the same way as before. Remember to paste the referral program ID.
Then, to retrieve the loyalty card, use the following code:
```
{% set ref_code = ContentApi.get_customer_referral_code({({"params":{"customer":"{{UserAttribute['Email (Standard)']}}"}})}) %}
```
The customer’s referral or loyalty card code is accessible with the same snippet:
```
{{ref_code.voucher.code}}
```
## Flows
A **Flow** in MoEngage lets you trigger actions in Voucherify based on what your users do.
Here’s how you can use it:
* **Send custom events** to Voucherify (like when a user opens an email or joins a segment)
* **Sync customer data** to keep your Voucherify profiles up to date
* **Publish referral codes** to new users automatically
It’s a simple way to connect user actions in MoEngage with campaigns and data in Voucherify.